ShopDreamUp AI ArtDreamUp
Deviation Actions


Suggested Deviants


Suggested Collections


You Might Like…


Description
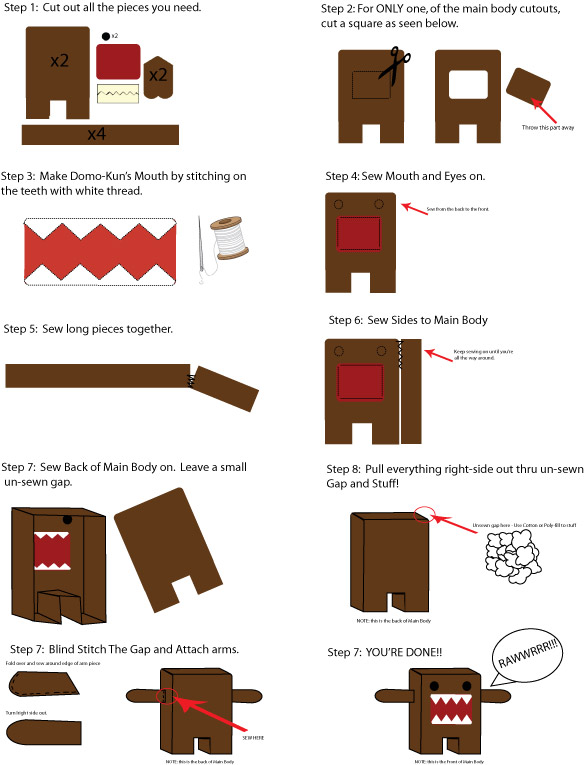
These are the handout guide to a workshop I did at Atomic Lollipop 2011. Many people were unable to get in to the workshop due to the max being only 15 students (sorries guys..but we didn't have enough fabric!).
There are two options, the easier pillow Domo-Kun or the advance Plushie version!
Happy sewing!! Below is a short Hand Sewing 101 lesson..but try Youtube or Goggle if you need more help! HAPPY PLUSHIE MAKING!
What you need!
Needle *
Fabric
Pins (Optional)
Thread**
Fabric pencil (Optional)
Measuring tape (optional)
Seam Ripper
Scissors
Step 1: Measure and Cut
-Remember the golden rule of sewing “Measure Twice, cut once”
Step 2: Mark out your stitch
-This is optional but for a VERY good patience to adopt – it will guarantee you sew straight even stitches.
-Use a fabric pencil to mark out 5mm apart (Note: You can rub away the marks later.)
Step 3: Pinning Fabric
-Pinning down the fabric will make sewing MUCH easier. His will also keeps fabric from moving while you sew.
-If you don’t have pins you can do a Basting Stitch (a long running stitch which can be removed later).
Step 4: Threading Needle
-Pull the thread through as much as you think you'll need for the length of the fabric being sewn.
-Double the thread over at the needle and Cut.
-Now make a knot to secure the two ends.
Step 5: Basic Stitch
-NOTE: This is only one stitch you can use when sewing. There are many used for different type of projects.
-Start at first mark you made (5mm from edge)
-Bring your needle up through the fabric from the back until the knot hits the fabric. Now pull thread through
-Poke needle down on the second mark on fabric (10mm from edge). Now pull thread through
-Poke needle at the back of fabric through 10mm dot. Again pull thread through
-Poke needle through to third mark on fabric (15mm from edge) and so on until you reach end of row.
Extra: Ripping
-Use a seam ripper if you make a mistake. Be VERY careful when doing this...not to rip the fabric
*The needle you use will depend on the fabric/project.
** Thread or Floss - An all-purpose cotton thread is good for most things. However, there are many threads to choose from. You'll often pick thread based on your project - cotton fabric = cotton thread, silk = silk thread, etc. Floss is much thicker and normally comes in six-string strands. You'll use this for embroidery and finishing.
Image size
585x765px 118.88 KB
© 2011 - 2024 Mokulen22
Comments1
Join the community to add your comment. Already a deviant? Log In
Coolz~!